Esper Notebook is a web-based notebook application for compiling EPL, executing event and time sequences, and viewing results. It enables EPL developers to be more productive by developing, organizing, executing, and sharing code and results without needing a compiler or runtime.
Esper Notebook organizes into notes. Each note contains multiple paragraphs. Each paragraph is either a snippet of EPL or a scenario with events and time.
When running a note, the notebook runs all paragraphs:
For paragraphs that contain EPL, the notebook compiles the EPL and displays compilation errors, if any.
For paragraphs that contain a scenario, the notebook executes the scenario and displays the output.
In summary, the notebook application allows you to:
Manages notes, import and export a note, save notes.
Run paragraphs; Set paragraph title and layout; Define the interpreter (EPL or scenario, others see below) for each parapgraph.
Create a report from a note, to print or to send out.
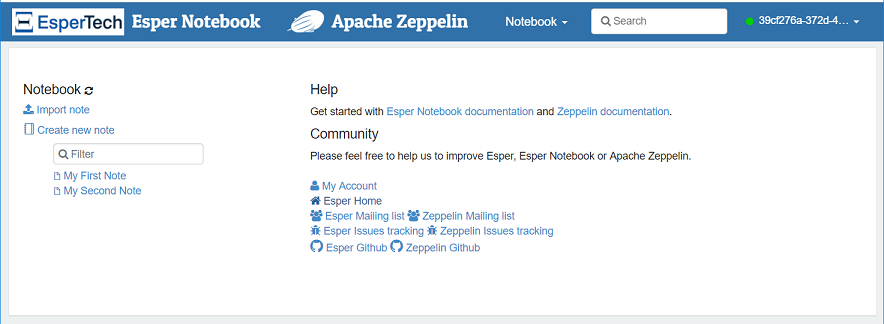
The main page is similar to the below screen capture.

The left side of the page lists the existing notes. Here you have the option to create a new note, import an existing note or to open a note.
The right side of the page contains the My Account link that brings you to the login account management page. The right side also has links to documentation and further help.
When you create a new note you can decide the default interpreter. By default this is Esper.
The Notebook button on the top navigation menu is a shortcut for navigating between notes and for creating new notes.
The upper right-hand corner is a drop-down that has a Logout option for logging out of your account.
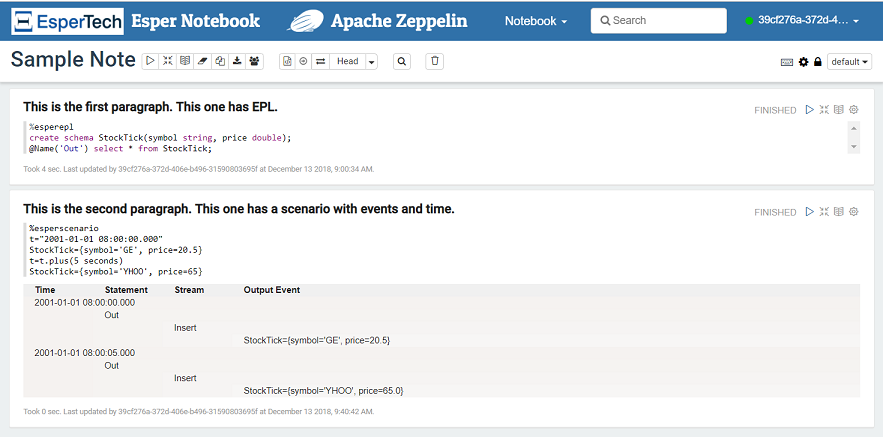
The next screen capture is a sample note page.

The note shown above has the name Sample Note. The note has two paragraphs. The first paragraph begins with %esperepl which tells the interpreter that the paragraph contains EPL. The second paragraph begins with %esperscenario which tells the interpreter that the paragraph contains a sequence of event and time.
Please find information on all interpreters below. There is another interpreter %espersetup for customizing output.
Each paragraph consists of 2 sections: A code section where you put your EPL or scenario, and a result section where you can see the result.
In the example above, for the paragraph with EPL there is no output as the sample EPL compiles without compilation errors. In the case when the EPL doesn't compile the compilation errors are directly below the EPL. For the paragraph with a scenario there is an HTML table with the output for that scenario.
You may run all paragraphs using the play icon of the top icon bar. You may also run a single paragraph by using the play icon of the paragraph.
Esper Notebook is provided by EsperTech Inc., builds on Apache Zeppelin and extends Zeppelin with Esper interpreters, EPL syntax highlighting and more. More information on Apache Zeppelin can be found at http://zeppelin.apache.org.
More information on the user interface can be found among the Apache Zeppelin user interface documentation at http://zeppelin.apache.org/docs/latest/quickstart/explore_ui.html.
Esper Notebook only provides the Esper interpreters.
The EPL Esper Event Processing Language interpreter is the default interpreter provided that the note default interpreter is Esper (the default). A paragraph that contains EPL can specify %esperepl.
The EPL paragraph editor has syntax highlighting and colors EPL keywords, comments, data types and more.
When running a paragraph that contains EPL the notebook compiles the EPL and displays any compilation errors in the same paragraph. When the compilation is successful the notebook retains the compiled EPL for that paragraph.
The compiler path consists of all the compiled EPL of all other EPL paragraphs of the same note.
Therefore you can have multiple EPL paragraphs that define event types (create schema) or other shared EPL objects such as named windows, tables and variables.
EPL documentation can be found at http://www.espertech.com/esper/esper-documentation.
A paragraph that contains a scenario consisting of a sequence of events and time must begin with %esperscenario.
A scenario is a list of instructions with one instruction per line. Each instruction can either:
Set or advance to a given time.
Send an event.
Advance time relative to the current time.
When running a paragraph that contains a scenario, the notebook performs these actions:
Allocates a runtime.
Sets the runtime current time.
Deploys all EPL that compiled successfully.
Validates and executes each instruction.
Displays EPL statement output events, by default as an HTML table.
When running a scenario, the default start time is 1970-01-01 00:00:00.000 unless the scenario, in the first instruction, sets another given time.
Current time is represented by a predefined long-type millisecond value by name t.
To set a time or advance to a given time, enter an assignment of time t to a string date-time value as follows:
t = "2001-01-01 08:00:00.000"
If the time is newer than the current time the time advances to the provided time.
To send an event, enter an assignment of event type name to an array of name-value pairs in curly braces. For example:
MyEvent = {intProperty = 0, stringProperty = 'abc'}You may use curly braces for array and collection values, like shown here:
MyEvent = {stringArray = {'a', 'b'}, listProperty = {1, 2, 3}}
The scenario interpreter converts array values to the given type, for example when the event type was declared as create schema MyEvent(stringArray string[]) the interpreter converts values for stringArray to array of string.
For object-array please use java.lang.Object[] as type. The interpreter supports array values for these types as well: java.util.Collection, java.util.List, java.util.ArrayList and java.util.Vector.
To assign the value of an EPL expression evaluation to an event property, use the eval function and specify the expression string. The next example assigns the result of the expression 5*5 to intProperty and the result of the myFunction function to stringProperty.
MyEvent = {intProperty = eval("5*5"), stringProperty = eval("myFunction('some value')")}To assign a value to a Date or Calendar-typed event property you may specify a string-value that contains a datetime value following one of these formats:
Table 3.1. Date Formats
| Format |
|---|
| yyyy-MM-dd HH:mm:ss |
| yyyy-MM-dd HH:mm:ss.SSS |
| yyyy-MM-dd HH:mm:ss.SSSZ |
| yyyy-MM-dd'T'HH:mm:ss |
| yyyy-MM-dd'T'HH:mm:ss.SSS |
| yyyy-MM-dd'T'HH:mm:ss.SSSZ |
For example:
MyEvent = {dateOrCalendarPropertyOne = '2002-09-30 9:00:00', dateOrCalendarPropertyTwo = '2002-09-30 9:00:00.000', dateOrCalendarPropertyThree = '2002-09-30 9:00:00.000+0100'}Events can be nested. Place the event properties of each nested event in curly braces. The nesting level is unlimited and nested classes are supported.
To illustrate, assume an order event that has a single order item as a nested event:
create schema OrderItem(itemId string, price double);
create schema OrderEvent(orderId string, item OrderItem);
The sample order event with a single order item is:
OrderEvent={orderId='O1', item={itemId='I1', price=100}}For multiple nested events, use curly braces to separate each event.
In below schema each order event can have multiple order items:
create schema OrderItem(itemId string, price double);
create schema OrderEvent(orderId string, items OrderItem[]);
The sample order event with multiple order items is:
OrderEvent={orderId='O1', items={{itemId='I1', price=100}, {itemId='I2', price=50}}}When using JavaBean-style events you must make sure that there are getters and setters for nested objects.
To advance time relative to current time, enter an assignment of time t to t plus a time period. For example:
t = t.plus(10 minutes 5 seconds)
The EPL "plus" date-time enumeration method and the time period parameter documentation in Esper docs have more information.
Alternatively, you may also advance time in millisecond steps by adding milliseconds to t:
t = t + 1000
The above example adds 1 second (1000 milliseconds) to the current time.
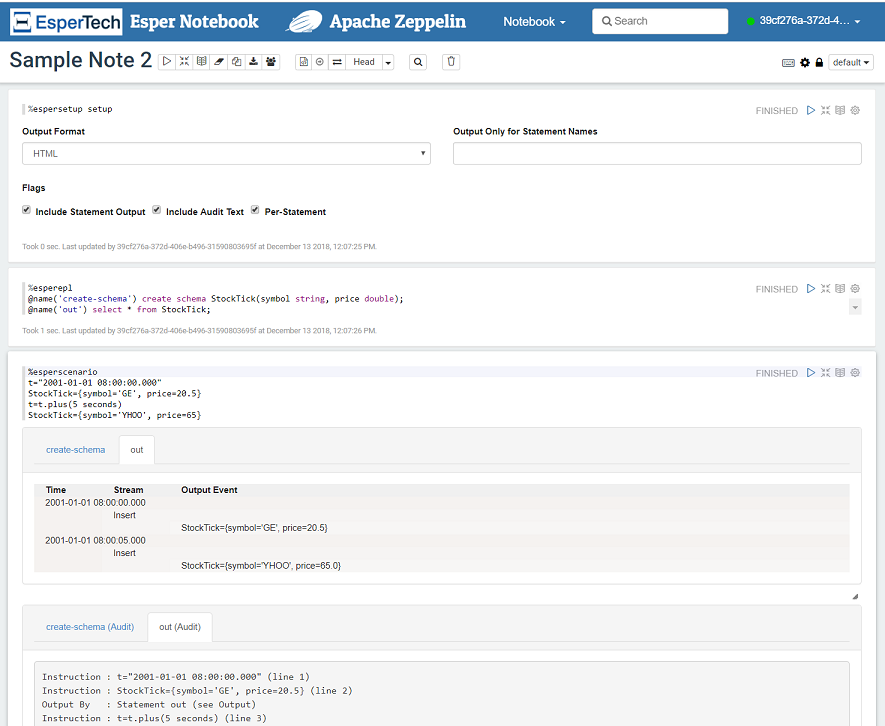
You can create a separate paragraph, specify %espersetup setup and run that paragraph. After running the paragraph presents a form with output options.
You can decorate your statements with the @Audit annotation for audit-level information on statement execution (use a %espersetup setup paragraph to enable audit output).
You may specify %espersetup setup in a separate paragraph. This interpreter, upon running, presents a form with output options.
Using %espersetup setup presents a paragraph similar to the below screen capture.

Please see the Github Issues for known issues. We track issues under the label zeppelin_notebook.
The link is https://github.com/espertechinc/esper/labels/zeppelin_notebook.